AWS S3 Loader User Guide
The S3 Loader allows you to easily integrate your TigerGraph instance with an Amazon S3 service and ingest data from S3 buckets either in realtime or via one-time data import into the TigerGraph System. Your TigerGraph instance can be deployed either on-premises or in a cloud environment.
The following diagram demonstrates the S3 Loader data architecture.
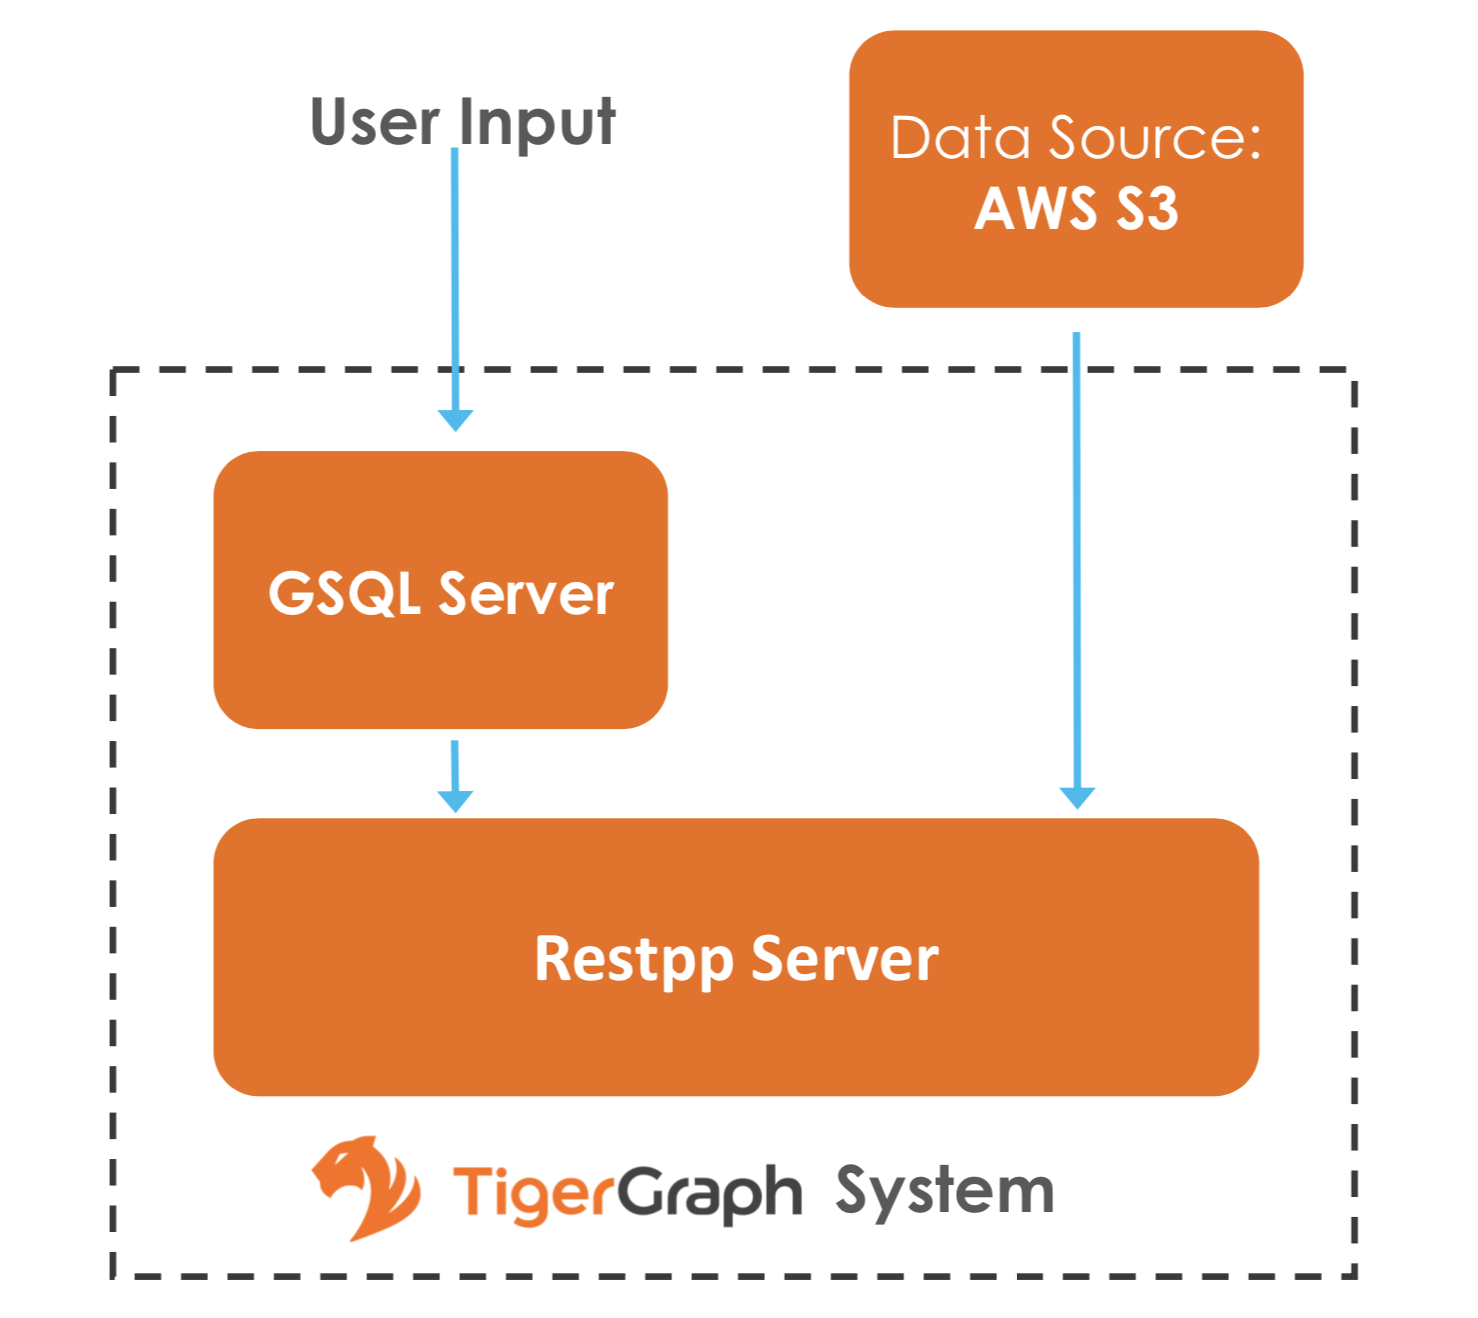
From a high level, a user provides instructions to the TigerGraph system through GSQL, and the external Amazon S3 data is loaded into TigerGraph’s RESTPP server.
Prerequisites
-
Your data is uploaded to Amazon S3 buckets.
-
You have the access key and the secret key that give you read access to your S3 bucket.
Configuring and using the S3 loader
Below are the steps to configure and use the S3 loader.
1. Define the data source
Before starting a S3 data loading job, you need to define the credentials to connect to Amazons S3.
The CREATE DATA_SOURCE statement defines a DATA_SOURCE type variable, with a subtype S3:
CREATE DATA_SOURCE S3 <data_source_name>S3 data source configuration file
After the data source is created, use the SET command to specify the path to a configuration file for that data source.
SET <data_source_name> = "/path/to/s3.config";This SET command reads, validates, and applies the configuration file, integrating its settings into TigerGraph’s dictionary.
The data source configuration file’s content, structured as a JSON object, describes the S3 credential settings, including the access key and secret key.
A sample s3.config is shown in the following example:
{
    "file.reader.settings.fs.s3a.access.key": "AKIAJ****4YGHQ",
    "file.reader.settings.fs.s3a.secret.key": "R8bli****p+dT4"
}
You can also provide the path to the data source variable at creation instead of using the SET command to specify the path:
CREATE DATA_SOURCE S3 example_data_source = "/path/to/s3.config"If you have a TigerGraph cluster, the configuration file must be on machine m1, where the GSQL server and GSQL client both reside, and it must be in JSON format. If the configuration file uses a relative path, the path should be relative to the GSQL client working directory.
Each time when the config file is updated, you must run SET data_source_name to update the data source details.
To further simplify, instead of specifying the S3 data source config file path, you can also directly provide the S3 data source configuration as a string argument. This is useful when you only have access to the GSQL shell, but do not have OS level access such as when you are on TigerGraph Cloud:
CREATE DATA_SOURCE S3 data_source_name = "{\"file.reader.settings.fs.s3a.access.key\":\"AKIAJ****4YGHQ\",\"file.reader.settings.fs.s3a.secret.key\":\"R8bli****p+dT4\"}"Global and local data sources
The S3 Loader supports the TigerGraph MultiGraph feature. In the MultiGraph context, a data source can be either global or local:
-
A global data source can only be created by a user with
WRITE_DATASOURCEprivilege on the global scope, who can grant the global data source to any graph. -
A user with
WRITE_DATASOURCEprivilege on a graph can only create local data sources on that graph. The local data sources cannot be accessed by other graphs.
The following are examples of permitted DATA_SOURCE operations.
-
A user with
WRITE_DATASOURCEprivilege on the global scope may create a global level data source without assigning it to a particular graph:CREATE DATA_SOURCE S3 s1 = "/path/to/config" -
A user with
WRITE_DATASOURCEprivilege on a graph may grant/revoke a data source to/from that graph:GRANT DATA_SOURCE s1 TO GRAPH graph1, graph2 REVOKE DATA_SOURCE s1 FROM GRAPH graph1, graph2 -
A user with
WRITE_DATASOURCEprivilege on a graph may create a local data source for that graphCREATE DATA_SOURCE S3 s1 = "/path/to/config" FOR GRAPH Test_Graph (1)1 The local data source s1is only accessible to graph Test_Graph. No one can grant it to another graph.
Delete data sources
A data source variable can be dropped by a user who has sufficient privilege.
A global data source can only be dropped by a user with WRITE_DATASOURCE globally.
A local data source can be dropped by a user with WRITE_DATASOURCE on that graph or globally.
The syntax for the DROP DATA_SOURCE command is as follows:
DROP DATA_SOURCE <source1>[<source2>...] | * | ALLBelow is an example with a few legal s3 data_source create and drop commands.
CREATE DATA_SOURCE S3 s1 = "/home/tigergraph/s3.config"
CREATE DATA_SOURCE S3 s2 = "/home/tigergraph/s3_2.config"

DROP DATA_SOURCE s1, s2
DROP DATA_SOURCE *
DROP DATA_SOURCE ALL
List data sources
The SHOW DATA_SOURCE command will display a summary of all existing data_sources for which the user has privilege:
$ GSQL SHOW DATA_SOURCE *

// The sample output:
Data Source:
  - S3 s1 ("file.reader.settings.fs.s3a.access.key": "AKIAJ****4YGHQ", "file.reader.settings.fs.s3a.secret.key": "R8bli****p+dT4")
// The global data source will be shown in global scope.
// The graph scope will only show the data source it has access to.
2. Create a loading job
The S3 Loader uses the same basic CREATE LOADING JOB syntax used for standard GSQL loading jobs.
A DEFINE FILENAME statement should be used to assign a loader FILENAME variable to a S3 data source name and the path to its config file.
In addition, the filename can be specified in the RUN LOADING JOB statement with the USING clause.
The filename value set by a RUN statement overrides the value set in the CREATE LOADING JOB.
Below is the syntax for DEFINE FILENAME when using the S3 Loader.
In the syntax, $DATA_SOURCE_NAME is the S3 data source name, and the path points to a configuration file which provides information about how to read an Amazon S3 file.
The S3 file configuration file must be in JSON format.
DEFINE FILENAME filevar "=" [filepath_string | data_source_string];
data_source_string = $DATA_SOURCE_NAME":"<path_to_configfile>
Example: Load a S3 Data Source s1, where the path to the file configuration file is ~/files.conf:
DEFINE FILENAME f1 = "$s1:~/files.config";S3 file configuration file
The S3 file configuration file tells the TigerGraph system exactly which Amazon S3 files to read and how to read them. Similar to the data source configuration file described prior, the contents are in JSON object format.
{
    "file.uris": "s3://my-bucket/data.csv"
}
The file.uris key is required.
It specifies one or more paths on your Amazon S3 bucket.
Each path is either to an individual file or to a directory.
If it is a directory, then each file directly under that directory is included.
You can specify multiple paths by using a comma-separated list.
The following example configuration file contains multiple paths:
{
    "file.uris": "s3://my-bucket1/data1.csv,s3://my-bucket1/data2.csv,s3://my-bucket2/data3.csv"
}
Instead of specifying the config file path, you can also directly provide the S3 file configuration as a string argument:
DEFINE FILENAME f1 = "$s1:~/files.config";
DEFINE FILENAME f1 = "$s1:{\"file.uris\":\"s3://my-bucket/data.csv\"}";
Configure s3 file loader
Besides the required file.uris key, you can further configure the S3 loader.
The following is a sample full configuration file:
{
    "tasks.max": 1,
    "file.uris": "s3://my-bucket/data.csv",
    "file.regexp": ".*",
    "file.recursive": false,
    "file.scan.interval.ms": 60000,
    "file.reader.type": "text",
    "file.reader.batch.size": 10000,
    "file.reader.text.archive.type": "auto",
    "file.reader.text.archive.extensions.tar": "tar",
    "file.reader.text.archive.extensions.zip": "zip",
    "file.reader.text.archive.extensions.gzip": "tar.gz,tgz"
}
Following is a detailed explanation of each option:
-
tasks.max(default is 1): specifies the maximum number of tasks which can run in parallel. E.g. if there are 2 files and 2 tasks, each task will handle 1 file. If there are 2 files and 1 task, the single task will handle 2 files. If there is 1 file and 2 tasks, one of the tasks will handle the file. -
file.uris: specifies the path(s) to the data files on Amazon S3. The path can also be dynamic by using expressions to modify the URIs at runtime. These expressions have the form${XX}where XX represents a pattern fromDateTimeFormatterJava class.
|
If you want to ingest data dynamically, i.e. directories/files created every day and avoid adding new URIs every time, you can include expressions in URIs to do that.
For example, for the URI |
-
file.regexp(default is.*which matches all files): the regular expression to filter which files to read. -
file.recursive(default is false): whether to recursively access all files in a directory. -
file.scan.interval.ms(default is 60000): the wait time in ms before starting another scan of the file directory after finishing the current scan. Only applicable in stream mode. -
file.reader.type(default is text): the type of file reader to use. If text, read the file line by line as pure text. If parquet, read the file as parquet format. -
file.reader.batch.size(default is 1000): maximum number of lines to include in a single batch. -
file.reader.text.archive.type(default is auto): the archive type of the file to be read.-
If
auto, determine the archive type automatically based on file extension. -
If
tar, read the file with tar format. -
If
zip, read the file with zip format. -
If
gzip, read the file with gzip format. The file reader only supports gzip files containing tar files. Standard gzip files are not supported. -
If
none, read the file normally.
-
-
file.reader.text.archive.extensions.tar(default is tar): the list of file extensions to be read with tar format. -
file.reader.text.archive.extensions.zip(default is zip): the list of file extensions to be read with zip format. -
file.reader.text.archive.extensions.gzip(default is gzip): the list of file extensions to be read with gzip format.
The archive type is applied to all files in file.uris when loading.
If you have different archive type files to be read at the same time, set auto for file.reader.text.archive.type and configure how to detect each archive extensions by providing the extensions list.
Currently we support tar, zip and gzip archive types.
However, the file reader only supports gzip files containing tar files. Standard gzip files are not supported.
3. Run the loading job
The S3 Loader uses the same RUN LOADING JOB statement that is used for GSQL loading from files.
Each filename variable can be assigned a string <datasource_variable>:<filepath>, which overrides the value defined in the loading job.
In the following example, the config files for f2 and f3 are being set by the RUN LOADING JOB command, whereas f1 is using the config which was specified in the CREATE LOADING JOB statement.
RUN LOADING JOB job1 USING f1, f2="$s1:~/files1.config", f3="$s2:~/files2.config", EOF="true";|
A |
All filename variables in one loading job statement must refer to the same DATA_SOURCE variable.
There are two modes for the S3 Loader: streaming mode and EOF mode. The default mode is streaming mode.
-
In streaming mode, loading will never stop until the job is aborted.
-
In EOF mode, loading will stop after consuming the provided Amazon S3 file objects.
To use EOF mode, add EOF="true" to the RUN LOADING JOB command:
RUN LOADING JOB [-noprint] [-dryrun] [-n [i],j] jobname
   [ USING filevar [="filepath_string"][, filevar [="filepath_string"]]*
   [, CONCURRENCY="cnum"][,BATCH_SIZE="bnum"]][, EOF="true"]
Manage loading jobs
S3 Loader loading jobs are managed the same way as native loader jobs. The three key commands are
-
SHOW LOADING STATUS -
ABORT LOADING JOB -
RESUME LOADING JOB
For example, the syntax for the SHOW LOADING STATUS command is as follows:
SHOW LOADING STATUS job_id|ALLTo refer to a specific job instance, use its job ID which is provided when RUN LOADING JOB is executed.
For each loading job, the above command reports the following information :
-
Current loaded lines
-
Average loading speed
-
Loaded size
-
Duration
See Inspecting and Managing Loading Jobs for more details.
S3 loader example
Here is an example code for loading data through the S3 Loader:
// Create data_source s3 s1 = "s3_config.json" for graph Test_Graph.
CREATE DATA_SOURCE S3 s1 FOR GRAPH Test_Graph
SET s1 = "s3_config.json"

// Define the loading jobs.
CREATE LOADING JOB load_person FOR GRAPH Test_Graph {
    DEFINE FILENAME f1 = "$s1:s3_file_config.json";
    LOAD f1
      TO VERTEX Person VALUES ($2, $0, $1),
      TO EDGE Person2Comp VALUES ($0, $1, $2)
      USING SEPARATOR=",";
}

// Load the data
RUN LOADING JOB load_person